
なんかいろいろありすぎて訳わかんなくなったので整理。
参考リンク
参考
ListBoxクラスBizの宝箱
参考
PulldownListクラスBizの宝箱
参考
ComboBoxクラスBizの宝箱
参考
CheckBoxクラスBizの宝箱
参考
OptionButtonクラスBizの宝箱
実行環境
・OS:Windows 10
・Biz/Designer:5.1.0.0
使い方
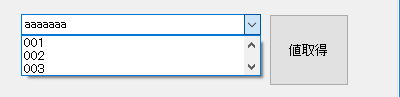
ListBox
ListBox ListBox1 { X = 24; Y = 16; Width = 240; Height = 72; ListItem ListItem1[]; ListItem1 csv(.title, .value) { "タイトル1","001" "タイトル2","002" "タイトル3","003" "タイトル4","004" "タイトル5","005" "タイトル6","006" };/* 注意事項 カンマの後にスペースを入れるのはNG */ Function GetTitle() { /* 未選択 */ if (this.Value 0) return; /* 値返却 */ return ListItem1[this.Value].Title; } Function GetValue() { /* 未選択 */ if (this.Value 0) return; /* 値返却 */ return ListItem1[this.Value].Value; } } Button Button2 { X = 272; Y = 16; Width = 80; Height = 72; Title = "値取得"; Function OnTouch( e ) { /* インデックスの場所を取得 */ //.MessageBox("Index:" + Str(^.ListBox1.Value)); /* 各種Functionを呼び出し値を取得 */ //.MessageBox("Title:" + ^.ListBox1.GetTitle()); //.MessageBox("Value:" + ^.ListBox1.GetValue()); } }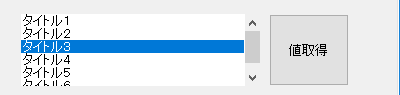
PulldownList
PulldownList PulldownList1 { X = 24; Y = 16; Width = 240; Height = 72; PulldownItem PulldownItem1[]; PulldownItem1 csv(.title, .value) { "タイトル1","001" "タイトル2","002" "タイトル3","003" "タイトル4","004" "タイトル5","005" "タイトル6","006" };/* 注意事項 カンマの後にスペースを入れるのはNG */ Function GetTitle() { /* 未選択 */ if (this.Value 0) return; /* 値返却 */ return PulldownItem1[this.Value].Title; } Function GetValue() { /* 未選択 */ if (this.Value 0) return; /* 値返却 */ return PulldownItem1[this.Value].Value; } } Button Button3 { X = 272; Y = 16; Width = 80; Height = 72; Title = "値取得"; Function OnTouch( e ) { /* インデックスの場所を取得 */ //.MessageBox("Index:" + Str(^.PulldownList1.Value)); /* 各種Functionを呼び出し値を取得 */ //.MessageBox("Title:" + ^.PulldownList1.GetTitle()); //.MessageBox("Value:" + ^.PulldownList1.GetValue()); } }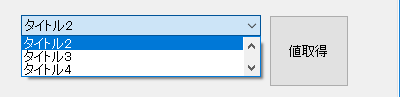
ComboBox
ComboBox ComboBox1 { X = 24; Y = 16; Width = 240; Height = 72; ComboItem ComboItem1[]; ComboItem1 csv(.value) { "001" "002" "003" "004" "005" "006" }; Function ConfirmChange(){ var result = false; for( var i = 0; i ComboItem1.length; i++ ) { if(ComboItem1[i].Value == this.Value){ result = true; } } return result; } } Button Button4 { X = 272; Y = 16; Width = 80; Height = 72; Title = "値取得"; Function OnTouch( e ) { /* 値を取得 */ //.MessageBox(Str(^.ComboBox1.Value)); /* CSVの中に存在するか */ //.MessageBox("存在確認:" + Str(^.ComboBox1.ConfirmChange())); } }※ComboBoxは手入力が可能なので、Valueを取得してもそのまま値が取得されます。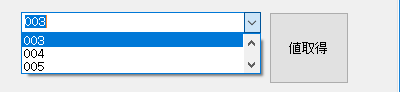
CheckBox
CheckBox CheckBox1 { X = 24; Y = 16; Width = 240; Height = 72; CheckItem CheckItem1[] { Height = 20; Width = 150; LayoutSpacing = 0; LayoutMargin = 2; Layout = $VERTICAL; LayoutSpacing = 2; }; CheckItem1 csv(.title, .value) { "タイトル1","001" "タイトル2","002" "タイトル3","003" "タイトル4","004" "タイトル5","005" "タイトル6","006" };/* 注意事項 カンマの後にスペースを入れるのはNG */ Function GetTitle(index) { /* 未選択 */ if (index 0) return; /* 値返却 */ return CheckItem1[index].Title; } Function GetValue(index) { /* 未選択 */ if (index 0) return; /* 値返却 */ return CheckItem1[index].Value; } Function GetValues() { var arr = new Array; for( var i = 0; i CheckItem1.length; i++ ) { arr[i] = CheckItem1[i].Selected; } return arr; } } Button Button5 { X = 272; Y = 16; Width = 80; Height = 72; Title = "値取得"; Function OnTouch( e ) { /* 値を取得 */ var arr = ^.CheckBox1.GetValues(); for( var i = 0; i arr.length; i++ ) { if(arr[i] == true) { //.MessageBox("Title:" + ^.CheckBox1.GetTitle(i)); //.MessageBox("Value:" + ^.CheckBox1.GetValue(i)); } } } }チェックボックスは複数選択が可能なので複数選択されてる考慮をして実装する必要があります。
OptionButton
OptionButton OptionButton1 { X = 16; Y = 368; Width = 240; Height = 72; OptionItem OptionItem1[] { Height = 20; Width = 150; LayoutSpacing = 0; LayoutMargin = 2; Layout = $VERTICAL; LayoutSpacing = 2; }; OptionItem1 csv(.title, .value) { "タイトル1","001" "タイトル2","002" "タイトル3","003" "タイトル4","004" "タイトル5","005" "タイトル6","006" };/* 注意事項 カンマの後にスペースを入れるのはNG */ Function GetTitle() { /* 未選択 */ if (this.Value 0) return; /* 値返却 */ return OptionItem1[this.Value].Title; } Function GetValue() { /* 未選択 */ if (this.Value 0) return; /* 値返却 */ return OptionItem1[this.Value].Value; } } Button Button6 { X = 272; Y = 368; Width = 80; Height = 72; Title = "値取得"; Function OnTouch( e ) { /* 値を取得 */ //.MessageBox("Title:" + ^.OptionButton1.GetTitle()); //.MessageBox("Value:" + ^.OptionButton1.GetValue()); } }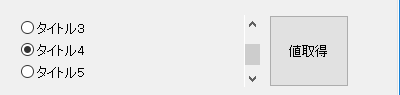
いろんな方法で設定してみる
クラスの中で直接CSVを記述してオペレーター( ←コレ)で流し込む以外のやり方以外。
if ( !$DESIGNTIME ) { /* CSVをココで作成 */ CSVDocument csvData = new CSVDocument; csvData csv(.title, .value) { "タイトル1","001" "タイトル2","002" "タイトル3","003" "タイトル4","004" "タイトル5","005" "タイトル6","006" "タイトル7","007" }; ListBox1.ListItem1 csvData; } if ( !$DESIGNTIME ) { /* ネットワークからCSVを取得 */ CSVDocument csvData = new CSVDocument; csvData.get("http://localhost/Test/test.csv"); /* カラム名を設定 */ csvData.setColumnName(0, ".title"); csvData.setColumnName(1, ".value"); /* オペレーターで値を設定 */ ListBox1.ListItem1 csvData; } if ( !$DESIGNTIME ) { /* ループで追加する */ CSVDocument csvData = new CSVDocument; for (var i = 0; i 10; i++ ){ ListBox1.ListItem1.insert(); ListBox1.ListItem1[i].Title = "タイトル" + str(i); ListBox1.ListItem1[i].Value = str(i); } }まとめたソース
まとめたソース載せておきます。使いたかったらコピペでご使用ください。
ソースを表示
ということで、いろいろやってみましたが
1個使い方覚えれば、特に問題無く使えそうですね。
以上。